Overview
XPT 5, Bill Acceptor, AE2600 (XP11090)
This hardware is an MEI AE2600 bill acceptor that’s identical to the one used in previous model XPTs, but with the addition of a USB interface converter.
*Caution: The programming coupon used for the XPT 5 bill acceptor is not the same as the one used for previous model XPTs. Using the wrong programming coupon will cause the bill acceptor to stop communicating until the right coupon is used.
Pictures & Connections
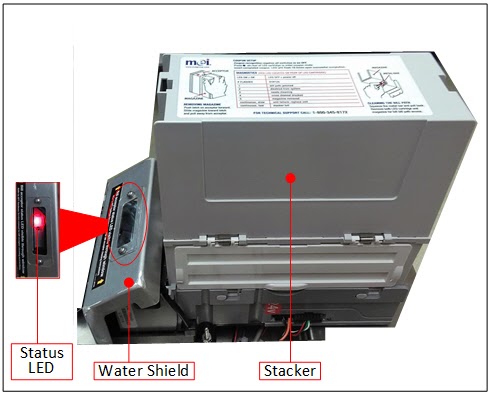
The pictures below show the bill acceptor attached to the vault door and the vault door open and in the down position.
Left
Right
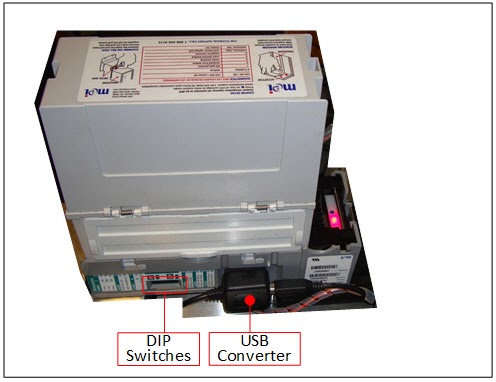
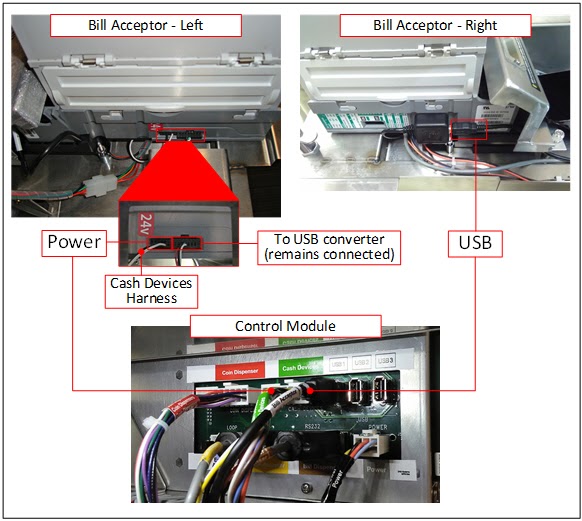
The bill acceptor connects to the cash devices harness for power, and to a USB cable that runs to the side of the control module for communication. A USB converter is adhered to the right side of the bill acceptor, which adapts the device’s native RS232 connection to USB.
Connections
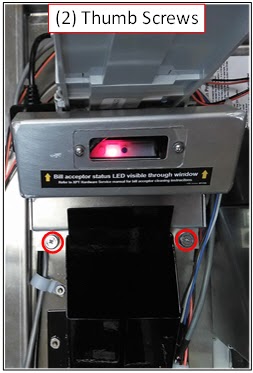
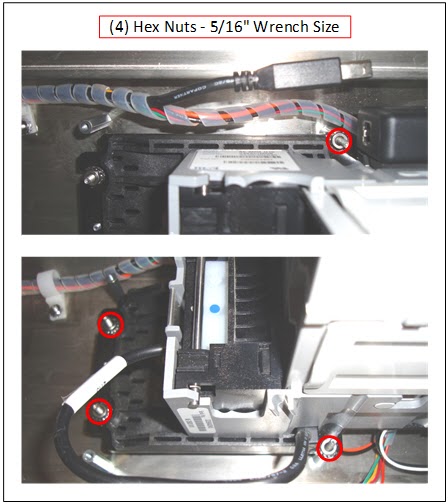
Serviceable Fasteners
Hex Nuts Securing the Bill Acceptor
Maintenance
The bill acceptor should be cleaned at least every 4 months for best performance.
A pre-saturated cleaning card (DRB Systems part# XP80000) or similar is the most convenient way to frequently clean the device.
1. Enter maintenance mode on the XPT.
a. Press and hold the Help button on the XPT. The security login screen appears.
b. Log in to security. The Main Status Screen appears.
2. Insert a cleaning card into the bill acceptor. The card is drawn in, and then ejected.
3. Repeat the step above, flipping and rotating the card between each insertion, until no additional dirt is removed on the card.
4. Press Exit to return to sales mode.
If a deeper cleaning is needed, the bill acceptor components can be easily disassembled and manually cleaned with a soft cloth and mild detergent (non-abrasive, non-petroleum based).
Manually cleaning the bill acceptor
1. Bill acceptor parts diagram.
2. Turn off the XPT.
a. Unlock the XPT main door. The security login screen appears.
b. Log in to security. The Main Status Screen appears.
c. Open the XPT main door.
d. Turn the power off using the switch on the front of the power module.
3. Unlock and open the vault door.
4. Remove the bill stacker from the bill acceptor.
a. Hold the stacker while pressing the blue latch at the top of the bill acceptor with your finger.
b. Slide the bill stacker towards the top of the vault door, then lift upwards to remove, and set aside for later reinstallation.
5. Remove the bill acceptor water shield.
a. Loosen the (2) spring-loaded thumb screws on the water shield.
b. Remove the water shield and set aside.
6. Remove the lower housing from the bill acceptor.
a. Reach under the bottom of the acceptor and locate a silver rod in the area below the status LED.
b. Using your thumb, push the silver rod up towards status LED and hold it there.
c. Firmly grasp the lower housing and slide it out of the bill acceptor.
7. Use a soft cloth dampened with mild detergent to wipe all areas of the bill path until clean. Image.
8. Slide the lower housing back into the bill acceptor until the silver rod snaps into place.
9. Reinstall the bill acceptor water shield.
a. Align the water shield with the spacers on the vault door.
b.Tighten the (2) spring-loaded thumb screws to secure the water shield.
10. Reinstall the bill stacker.
a. Slide the bill stacker onto the bill acceptor until the blue tab snaps into place.
11. Close and lock the vault door.
12. Turn on the XPT.
Troubleshooting
*Caution: Make sure to reinstall the bill acceptor water shield if it is removed during any service process.
Reprogramming the bill acceptor
*Caution: Do NOT use the programming coupons from pre-XPT 5 bill acceptors. Doing so will cause the bill acceptor to stop communicating until programmed again with the correct coupon.
1. Print and cut out the bill acceptor programming coupon.
a. Cut out the coupon. It will be the exact size of a dollar bill.
2. Verify all DIP switches on the side of the bill acceptor are turned OFF. Failure to do so will cause the programming coupon to be ignored.
3. Program the bill acceptor.
a. Remove the water shield from the back of the bill acceptor.
b. Press the button on the back of the bill acceptor, next to the status LED. The status LED starts blinking rapidly.
c. Insert the printed coupon into the acceptor, face up, printed arrows first.
d. Verify the status LED on the back of the bill acceptor blinks 10 times, indicating successful programming.
e. Disable and enable the bill acceptor in maintenance mode.
4. Test the bill acceptor.
a. Insert a bill or bills and verify they are counted on screen.
b. If the bill acceptor does not operate correctly, repeat the reprogramming steps above.
5. Reinstall the water shield on the back of the bill acceptor.
Configuring the bill denominations to be accepted
The bill acceptor ships from the factory configured to accept $1, $5, $10, and $20 bills. The preferred method for disabling any of these denominations is by modifying the peripherals.xml file.
Changing the DIP switches or using a modified programming coupon will disable bill denominations, but will not properly update the Bill Acceptor screen in maintenance mode to indicate which are accepted.
1. Add or delete bill denominations in the peripherals.xml file.
a. Establish a remote desktop connection to the XPT.
b. Press Alt+F4 to close the XPT.exe.
c. Browse to the D:\SiteWatch folder.
d. Open the peripherals.xml file using Notepad.
e. Find the <BillAcceptor... entry, and add or delete any of the (4) bill denominations noted in green below:
<BillAcceptor Installed="Y" ComPort="COM7" Currency="USD" Accept="1|5|10|20"/>
f. The following example would accept $1, $5, and $10, but not $20 bills:
<BillAcceptor Installed="Y" ComPort="COM7" Currency="USD" Accept="1|5|10"/>
g. Save and close the peripherals.xml file.
h. Restart the XPT through Windows or turn the power off using the switch on the front of the power module, wait 10 second, and then turn it back on.
Status LED flash patterns
1. The red status LED on the back of the bill acceptor indicates the status of the bill acceptor.
2. If the LED is steady on, the bill acceptor is receiving power; if the LED is off, the bill acceptor power is off.
3. If the LED is flashing, use the following table to determine the status of the bill acceptor: LED flash patterns
Specific bill types ($1, $5, $10, or $20) are consistently rejected
1. Verify the DIP switches on the side of the bill acceptor are all set to OFF.
2. Check the bill acceptor configuration in maintenance mode.
a. From the Main Status Screen press the Enable & Test Hardware button. The Enable & Test Hardware screen appears.
b. Press the Bill Acceptor button. The XPT Bill Acceptor screen appears.
c. Check the Hardware configured to accept section to see if the problematic denomination(s) should be accepted.
Note: The Hardware configured to accept section will only report the bills that are configured in the peripherals.xml file. If the bill acceptor has been manually configured to reject specific denominations either through a programming coupon or the DIP switches, it will not be reflected in the Hardware configured to accept section.
i. If it does indicate they should be accepted, reprogram the bill acceptor using the programming coupon.
ii. If it does not indicate they should be accepted, delete the peripherals.xml file.
Bills are periodically rejected
1. Clean the bill acceptor according to the steps in the "Maintenance" section above.
2. Verify the DIP switches on the side of the bill acceptor are all set to OFF.
3. If the problem persists, reprogram the bill acceptor using the programming coupon.
Bill acceptor reports a status of Stacker Removed
1. Remove and reinstall the stacker.
a. Hold the stacker while pressing the blue latch at the top of the bill acceptor with your finger.
b. Slide the stacker towards the top of the vault door, then lift upwards to remove.
c. Slide the stacker onto the bill acceptor until the blue tab snaps into place.
2. Disable and enable the bill acceptor in maintenance mode.
3. Restart the XPT.
4. If the problem persists, remove the stacker again and carefully clean the sensors at the bottom of the cassette and the acceptor housing, according to the steps in the "Maintenance" section above.
Bill acceptor reports a communication-related error (Cannot Connect, Disconnected, Not Initialized, Communication Error, No Response, Invalid Command)
1. Disable and enable the bill acceptor in maintenance mode.
2. Restart the XPT.
3. If the problem persists, connect the bill acceptor USB cable to a different USB port on the side of the control module, and then restart the XPT again.
4. Determine if the bill acceptor is receiving power.
a. If the bill acceptor status LED is on or flashing, the bill acceptor is receiving power. Proceed to the next troubleshooting step.
b. If the bill acceptor status LED is not on or flashing, verify the cash devices harness is connected to the side of the control module and the bill acceptor.
c. If the problem continues, verify the 24V LED on the control module is on.
d. If the control module 24V LED is on, replace the bill acceptor.
e. If the control module 24V LED is off, refer to the "XPT 5 Control Module" topic for troubleshooting.
5. Verify connections and DIP switch settings.
a. Verify the USB cable from the control module is connected to the bill acceptor USB converter.
b. Verify the USB converter on the right side of the bill acceptor is connected to the left side of the bill acceptor.
c. Verify the DIP switches on the side of the bill acceptor are all OFF.
6. If the status LED on the back of the bill acceptor indicates “Disabled from system”, reprogram the bill acceptor using the programming coupon.
Bill acceptor reports a status of No Configuration, Invalid Configuration, or Denomination not Specified
1. Restart the XPT.
2. Delete the peripherals.xml file.
a. Establish a Remote Desktop connection to the XPT.
b. Press Alt+F4 to shut down the XPT.exe.
c. Browse to the XPT D:\SiteWatch folder.
d. Delete the peripherals.xml file.
e. Restart the XPT.
Bill acceptor reports a status of Reset or Repair Required
1. Disable and enable the bill acceptor in maintenance mode.
2. Restart the XPT.
3. If the problem persists, the bill acceptor should be replaced.
Bill acceptor reports a status of Hardware Service Offline.
1. Restart the XPT.
2. If the problem persists, the SSD should likely be replaced.
Replacing
*Warning: Turn off the XPT before modifying any power wiring connections.
Tools needed
5/16" nut driver
1. Turn off the XPT.
a. Unlock the XPT main door. The security login screen appears.
b. Log in to security. The Main Status Screen appears.
c. Open the XPT main door.
d. Turn the power off using the switch on the front of the power module.
2. Unlock and open the vault door.
3. Remove the bill stacker from the bill acceptor.
a. Hold the stacker while pressing the blue latch at the top of the bill acceptor with your finger.
b. Slide the bill stacker towards the top of the vault door, then lift upwards to remove, and set aside for reinstallation on the replacement bill acceptor.
4. Disconnect the power and USB cable from the bill acceptor.
a. Disconnect the power cable from the left side of the bill acceptor.
b. Disconnect the USB cable from the right side of the bill acceptor.
5. Remove the bill dispenser bill chute.
a. Remove the (2) hex nuts securing the bill chute using a 5/16” nut driver.
b. Remove the bill chute and set aside.
6. Remove the bill acceptor water shield.
a. Completely loosen the (2) spring-loaded thumb screws on the water shield.
b. Remove the water shield and set aside.
7. Remove the bill acceptor from the vault door.
a. Remove the (4) hex nuts securing the bill acceptor using a 5/16” nut driver.
b. Remove the bill acceptor.
8. Install the replacement bill acceptor.
a. Align the replacement bill acceptor with the studs on the vault door.
b. Tighten the (4) hex nuts using a 5/16” nut driver.
9. Install the bill stacker onto the replacement bill acceptor.
a. Slide the bill stacker onto the bill acceptor until the blue tab snaps into place.
10. Reinstall the bill acceptor water shield.
a. Align the water shield with the spacers on the vault door.
b. Tighten the (2) spring-loaded thumb screws to secure the water shield.
11. Reinstall the bill dispenser bill chute.
a. Align the bill chute with the studs on the vault door.
b. Tighten the (2) hex nuts using a 5/16" nut driver.
12. Connect the power and USB cables to the replacement bill acceptor.
a. Connect the power cable to the left side of the bill acceptor.
b. Connect the USB cable to the right side of the bill acceptor.
13. Close and lock the vault door.
14. Turn on the XPT and log in to security.
a. Turn the power on using the switch on the front of the power module. The XPT starts up and the security login screen appears.
b. Log in to security. The Main Status Screen appears.
15. Test the bill acceptor operation in maintenance mode.
a. Press the Enable & Test Hardware button. The Enable & Test Hardware screen appears.
b. Press the Bill Acceptor button. The Bill Acceptor screen appears.
b. Verify the Status is OK.
c. Insert a $1, $5, $10, or $20 bill and verify that it is counted on-screen.
Note: Whether the test bills are stacked or ejected depends on the current state of the Stacking Bills (press to eject) / Ejecting Bills (press to stack) button.
d. When finished, press Exit twice.
16. Close and lock the XPT main door.
White Water guide · Download PDF ↗