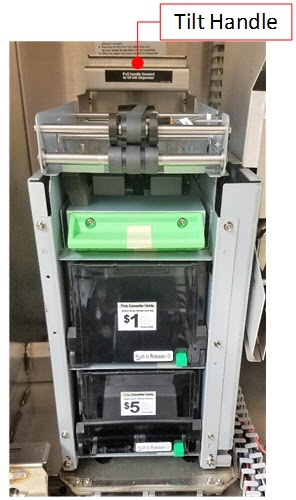
Front
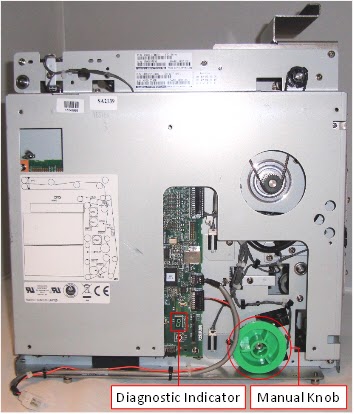
Side
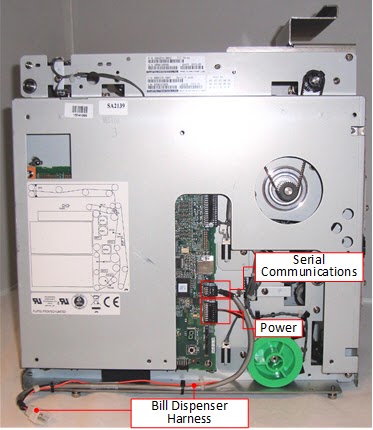
Connections:
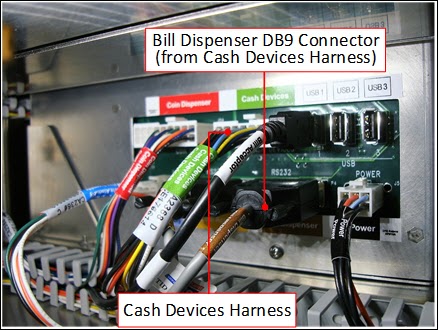
A short harness is attached to the bill dispenser that combines the serial communications and power connections from the bill dispenser control board into a single connector. The bill dispenser harness then connects to the cash devices harness, which splits back into two connectors at the side of the control module.
Side of Unit
Bottom Area
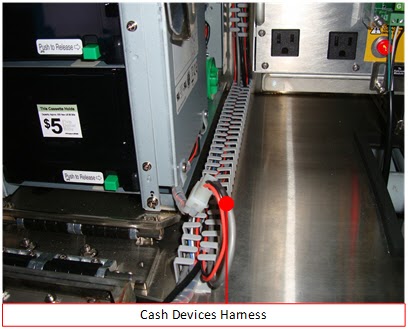
Control Module Connections
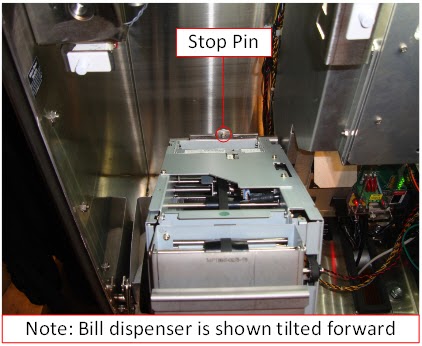
Serviceable Fastener Pin
Maintenance:
*Note: The vault door and bill dispenser baseplate use friction hinges that add intentional resistance to control the speed of opening and closing. These hinges should NOT be lubricated.
1. Clean the sensors.
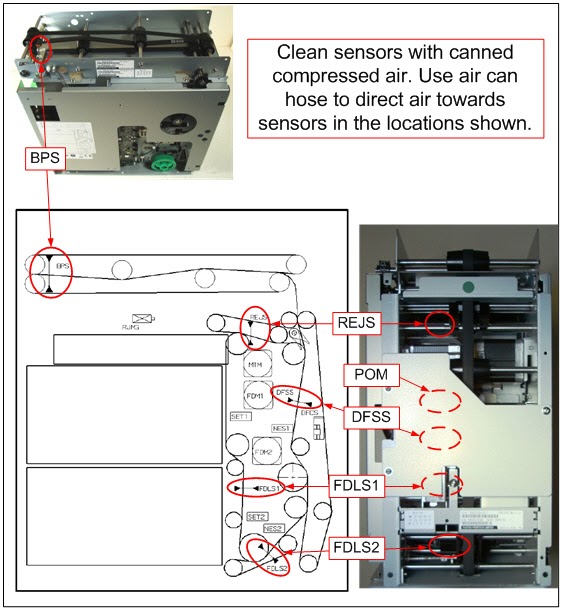
Use a can of compressed air to remove dust and debris from the following sensors:
Do NOT use on-site compressed air lines because of the potential for damage resulting from moisture and high pressure. Purchase canned spray air from a local electronics or office supply store.
BPS
REJS
DFSS
FDLS1
FDLS2
POM
2. Clean the pick and sub rollers.
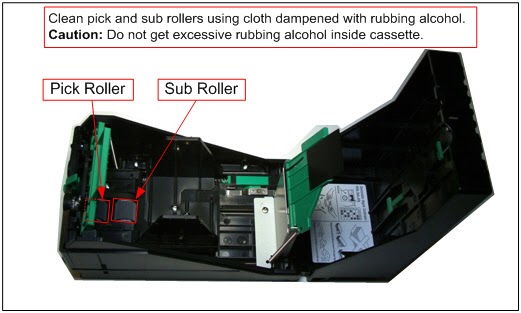
The pick and sub rollers should be cleaned at least every four months to maintain reliable operation.
Use a can of compressed air to blow out any debris and rubber shavings from around the pick and sub rollers.
Dampen a soft cloth with rubbing alcohol.
Clean the exposed surface of the pick and sub rollers.
Rotate the sub roller and continue cleaning.
Repeat this step until the entire surface of the sub roller is clean. Note: The pick roller cannot be rotated by hand, to prevent bill theft when the cassette is locked. Therefore, only the exposed surface can be cleaned.
Allow the roller surfaces to dry for 1 minute before reloading with bills.
Troubleshooting
*Note: Sunlight can interfere with the bill dispenser sensors and cause a variety of errors. Close the vault door before testing the dispenser.
*Note: The vault door and bill dispenser baseplate use friction hinges that add intentional resistance to control the speed of opening and closing. These hinges should NOT be lubricated.
How to verify proper bill quality and loading
*Note: It is very important that bills be in good condition and loaded correctly in order to be dispensed reliably. Many bill dispenser errors occur because of poor bill quality or improper loading.
1. Sort through used bills and remove any with tears, folded corners, ripples, or excessive wear.
2. Loading the bill dispenser.
a. Unlock and open the vault door.
b. Release each bill dispenser cassette by pressing the green button labeled Push to Release on the front of each.
c. Slide each cassette out of the bill dispenser by pulling it towards the front of the XPT.
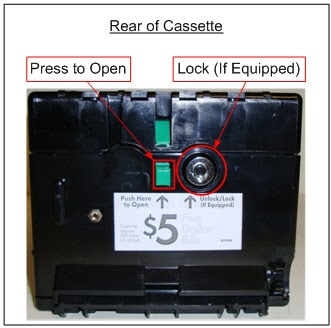
d. Unlock each cassette, and press the green button on the rear of the cassette to open the lid.
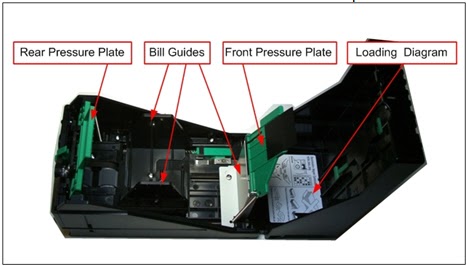
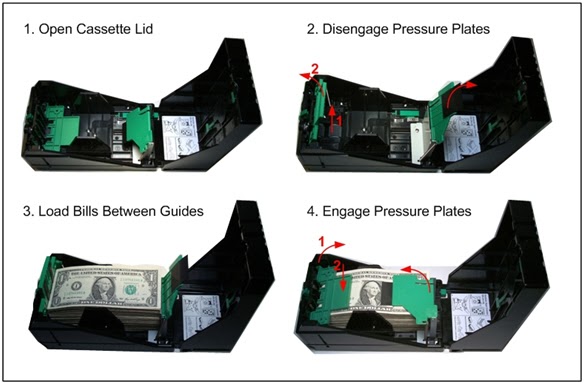
e. Disengage the rear pressure plate by sliding it upward, then rotating it toward the back of the cassette until it locks into place.
f. Disengage the front pressure plate by swinging it toward the front of the cassette until it locks into place.
g. Hold a stack of up to 500 bills firmly in one hand, and fan them using your other hand to make sure no bills are stuck together. Repeat the process on both ends of the bill stack.
h. Remove any bills that are sticking out of the bill stack. The bill stack should be neat and orderly.
i. Insert a stack of up to 500 bills into the cassette that is labeled for the correct denomination ($1, $5, etc.).
i. Caution: Loading bills in a cassette labeled for the wrong denomination will result in the XPT issuing the wrong amount of change!
ii. Caution: Overloading the cassette could result in bill jams!
j. Engage the front and rear pressure plates by moving them in the opposite direction used to disengage them.
k. Close each cassette lid and lock.
l. Slide each cassette back into the bill dispenser.
i. Note: Each cassette can be loaded in either the top or bottom position in the bill dispenser, as SiteWatch recognizes the bill denomination according to the cassette type (indicated by the label on the front of each cassette).
m. Lift up on the front of the reject tray, and then slide it out of the bill dispenser.
n. Remove all bills from the reject tray and DO NOT load those bills back into the bill dispenser.
o. Slide the reject tray back into the bill dispenser.
p. Close and lock the vault door.
Bill dispenser cassette reports the incorrect bill denomination in maintenance mode.
1. Verify the cassette’s magnets are installed correctly.
a. Unlock and open the vault door.
b. Release each bill dispenser cassette by pressing the green button labeled Push to Release on the front of each.
c. Slide each cassette out of the bill dispenser by pulling it towards the front of the XPT.
d. Unlock each cassette, and press the green button on the rear of the cassette to open the lid.
e. Position the cassette as shown below so you can see the magnets.
i. Note: There are four magnet positions in each cassette: A, B, C, and D as shown below.
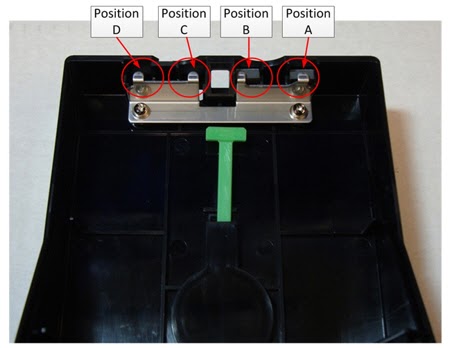
f. Verify correct magnet position.
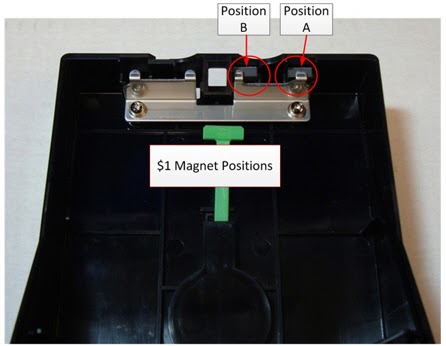
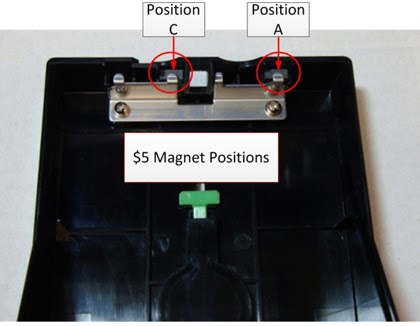
i. $1 bill cassette: Magnets are in positions A and B only.
ii. $5 bill cassette: Magnets are in positions A and C only.
g. Changing the bill dispenser cassette magnet positions.
i. Note: To prevent the incorrect amount of change being issued from the bill dispenser, make sure the cassette magnets are configured for the denomination listed on the bill dispenser cassette label.
ii. Identify the bill denomination as shown on the cassette's exterior label. It will be labeled as $1 or $5.
iii. Loosen the two magnet bracket screws with a #2 Phillips screwdriver, and then lift the bracket away from the magnets.
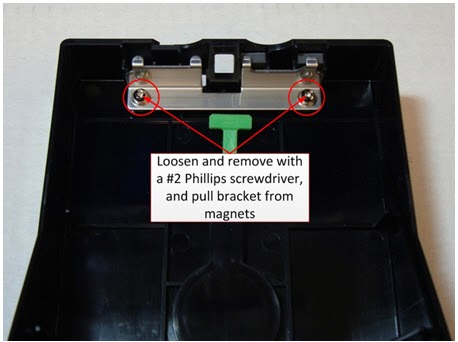
iv. Carefully move the bracket back far enough to allow for removal of one or both magnets.
v. Use the reference photos above to position the magnets for the denomination of bills this cassette will dispense.
vi. Replace the bracket using the #2 Phillips screws that were previously removed.
vii. Close and lock the bill dispenser cassette.
viii. Insert the cassette into the bill dispenser and verify it reports the correct denomination in maintenance mode.
Bill dispenser cassette persistently reports a status of Pick Failure or Empty when it is not
1. Refer to the “How to verify proper bill quality and loading” section above. A Pick Failure status often occurs due to poor quality bills or improper loading.
2. Clean the pick and sub rollers according to the steps in the "Maintenance" section above.
3. If the problem persists, the cassette(s) may need to be replaced.
a. DRB Systems part numbers:
i. $1 cassette: XP02100
ii. $5 cassette: XP02120
Bill dispenser reports a status of Bill Jam
1. Determine the location of the bill jam and remove it.
a. Unlock and open the vault door.
b. Grab the handle on the top of the bill dispenser, towards the back, and pull forward, to tilt the bill dispenser.
c. If the bill dispenser error reports a bill jam with a specific sensor reference (shown in diagram below), look in that area for the jammed bill or debris.
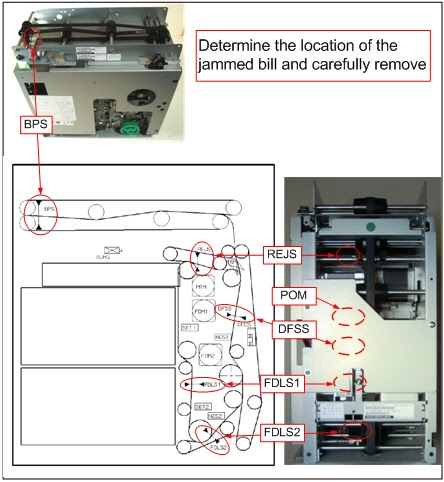
d. Turn the manual knob clockwise and counter-clockwise to loosen the jammed bill or debris.
e. Remove the bill by carefully sliding it out of the belts.
f. Reset the bill dispenser in maintenance mode.
i. From the Main Status Screen, press the Enable & Test Hardware button. The Enable & Test Hardware screen appears.
ii. Press the Bill Dispenser button. The Bill Dispenser screen appears.
iii. Press the Reset Dispenser button.
g. If the bill dispenser status continues to report a jam at a specific sensor, refer to the "Maintenance" section of this document to clean the sensor.
h. Tilt the bill dispenser back into the XPT, and close and lock the vault door.
Bill dispenser reports a status of Reject Tray Full or Reject Box Full.
1. Remove all bills from the reject tray and remove any jammed bills in the reject area.
a. The Reject Tray Full status will normally be reported whenever the tray has become overfilled, causing a jam in the reject area. Therefore, the reject tray should be emptied each time either bill cassette is refilled.
b. Unlock and open the vault door.
c. Lift up on the front of the reject tray, and then slide it out of the bill dispenser.
d. Determine if a bill remains jammed in the belts that deliver bills to the reject area.
e. Tilt the bill dispenser by grabbing the handle on top of it and pulling forward.
f. Turn the manual knob clockwise and counter-clockwise to loosen the jammed bill.
g. Carefully pull the jammed bill out of the belts and rollers.
h. Reset the bill dispenser in maintenance mode.
i. From the Main Status Screen, press the Enable & Test Hardware button. The Enable & Test Hardware screen appears.
ii. Press the Bill Dispenser button. The Bill Dispenser screen appears.
iii. Press the Reset Dispenser button.
i. Tilt the bill dispenser back into the XPT.
j. Slide the reject tray back into the bill dispenser.
k .Close and lock the vault door.
Bill dispenser reports a status of Sensor Malfunction
1. Verify the vault door is closed while dispensing, as sunlight can interfere with the sensors.
2. Reset the bill dispenser in maintenance mode.
a. From the Main Status Screen, press the Enable & Test Hardware button. The Enable & Test Hardware screen appears.
b. Press the Bill Dispenser button. The Bill Dispenser screen appears.
c. Press the Reset Dispenser button.
3. Clean the sensors by following the instructions in the "Maintenance" section above.
Bill dispenser reports a status of Communication Failure
1. Reset the bill dispenser in maintenance mode.
a. From the Main Status Screen, press the Enable & Test Hardware button. The Enable & Test Hardware screen appears.
b. Press the Bill Dispenser button. The Bill Dispenser screen appears.
c. Press the Reset Dispenser button.
2. Inspect the bill dispenser serial communication cable, power cable, and connectors for problems.
a. Unlock and open the vault door.
b. Tilt the bill dispenser by grabbing the handle on top of it and pulling forward.
c. Verify the bill dispenser is receiving power by observing the diagnostic indicator on the side of the bill dispenser.
i. If the diagnostic indicator is not lit:
Turn the XPT power switch off, and leave it off.
Verify the bill dispenser harness is connected to the cash devices harness.
Verify the bill dispenser harness is connected to the bill dispenser control board.
Verify the cash devices harness is connected to the control module.
Turn the XPT power switch on.
If the diagnostic indicator is still not lit, verify the 24V LED on the control module is on.
If it is not, refer to the "XPT 5 Control Module" topic for troubleshooting information.
If the diagnostic indicator is lit, continue troubleshooting.
d. Verify the bill dispenser DB9 connector from the cash devices harness is connected to the COM port on the side of the control module.
e. Verify the bill dispenser harness serial communications connector is fully seated on the bill dispenser control board.
f. Tilt the bill dispenser back into the vault.
g. Close and lock the vault door.
h. Restart the XPT.
i. Unlock the XPT main door. The security login screen appears.
ii. Log in to security. The Main Status Screen appears.
iii. Open the XPT main door.
iv. Turn the power off using the switch on the front of the power module.
v. Wait a minimum of 10 seconds.
vi. Turn the power back on.
Bill dispenser reports a status of Unknown Removed for both cassettes
1. Reseat each cassette.
a. Unlock and open the vault door.
b. Press the green Press to Release button on the front of each cassette.
c. Push each cassette back into the bill dispenser until it clicks into place.
d. The bill dispenser should reinitialize and return to a normal status.
e. Close and lock the vault door.
Bill dispenser reports a status of Unknown Removed for one cassette
1. Swap the cassette positions.
a. Unlock and open the vault door.
b. Remove both cassettes by pressing the green button labeled Press to Release on the front of each cassette.
c. Insert the cassette removed from the top position into the bottom position of the bill dispenser.
d. Insert the cassette removed from the bottom position into the top position of the bill dispenser.
e. If the Unknown Removed error follows the cassette, it likely needs to be replaced.
i. DRB Systems part numbers:
$1 cassette: XP02100
$5 cassette: XP02120
f. Close and lock the vault door.
Bill dispenser status continuously reports Initializing
1. Wait up to 30 seconds for the bill dispenser to connect.
2. Close the vault door while dispensing. Sunlight can interfere with the sensors and cause the dispenser to reinitialize.
3. Verify the cassettes are fully inserted.
a. Unlock and open the vault door.
b. Verify that both cassettes are fully inserted into the bill dispenser.
i. Note: Both cassettes must be inserted for the bill dispenser to initialize for the first time after booting up. Afterwards, the bill dispenser will continue to operate if one cassette is removed.
c. Close and lock the vault door.
4. Reset the bill dispenser in maintenance mode.
a. From the Main Status Screen, press the Enable & Test Hardware button. The Enable & Test Hardware screen appears.
b. Press the Bill Dispenser button. The Bill Dispenser screen appears.
c. Press the Reset Dispenser button.
Bill dispenser reports a status of Invalid Port
1. Restart the XPT.
a. Unlock the XPT main door. The security login screen appears.
b. Log in to security. The Main Status Screen appears.
c. Open the XPT main door.
d. Turn the power off using the switch on the front of the power module.
e. Wait a minimum of 10 seconds.
f. Turn the power back on.
2. If the error persists, delete the XPT.ini file.
a. Establish a Remote Desktop connection to the XPT.
b. Press Alt+F4 to shut down the XPT.exe.
c. Browse to the XPT D:\SiteWatch folder.
d. Delete the XPT.ini file.
e. Restart the XPT.
Bill dispenser continually rejects bills from the bottom cassette, and/or reports a status of Bill Too Long
1. Close the vault door while dispensing. Sunlight can interfere with the sensors and cause the dispenser to reinitialize.
2. Clean the sensors by following the instructions in the "Maintenance" section above.
3. If the issue persists, it’s likely the bill dispenser belts have stretched and worn over time, and are no longer moving the bills efficiently. Replace the bill dispenser.
Bill dispenser reports a status of Invalid Port
1. Restart the XPT.
a. Unlock the XPT main door. The security login screen appears.
b. Log in to security. The Main Status Screen appears.
c. Open the XPT main door.
d. Turn the power off using the switch on the front of the power module.
e. Wait a minimum of 10 seconds.
f. Turn the power back on.
2. Verify the POM sensor is free of any debris, and remove as necessary.
3. If the error persists, the bill dispenser should likely be replaced.
Replacing
*Caution: Turn off the XPT before modifying any power wiring connections.
Tools needed
None
1. Turn off the XPT.
a. Unlock the XPT main door. The security login screen appears.
b. Log in to security. The Main Status Screen appears.
c. Open the XPT main door.
d. Turn the power off using the switch on the front of the power module.
2. Unlock and open the vault door.
3. Disconnect the bill dispenser harness from the cash devices harness.
4. Tilt the bill dispenser forward.
a. Lift up and remove the reject tray from the bill dispenser and set aside for later installation in the replacement bill dispenser.
b. Grab the handle on the top of the bill dispenser, towards the back, and pull forward.
c. Tilt the bill dispenser fully towards the front of the XPT.
5. Remove the bill dispenser.
a. Reach under the back of the bill dispenser base plate, and pull the spring-loaded stop pin downwards, and then rotate 1/4 turn to lock it in place.
b. Grab the bill dispenser and slide it towards the back of the base plate, then pull it away from the base plate, and set aside.
6. Install the replacement bill dispenser.
a. Align the bolts on the bottom of the bill dispenser with the slots in the base plate inside the XPT.
b. Slide the bill dispenser toward the front of the base plate.
c. Rotate the stop pin 1/8 to 1/4 turn, until it snaps into place.
7. Tilt the bill dispenser back into the XPT.
8. Slide the reject tray from the original bill dispenser into the replacement bill dispenser.
9. Connect the replacement bill dispenser harness to the connector on the cash devices harness.
10. Close and lock the vault door.
11. Turn on the XPT and log in to security.
a. Turn the power on using the switch on the front of the power module. The XPT starts up and the security login screen appears.
b. Log in to security. The Main Status Screen appears.
12. Test the bill dispenser operation in maintenance mode.
a. Press the Enable & Test Hardware button. The Enable & Test Hardware screen appears.
b. Press the Bill Dispenser button. The Bill Dispenser screen appears.
c. Press the Dispense Test Bills button next to each cassette and verify that a bill is dispensed. Note: The user must belong to a security role with a key to the XPT Cash Disp lock to complete this step.
d. When finished, press Exit twice.
13. Close and lock the XPT main door.
White Water guide · Download PDF ↗