XPT 5 Hecon Receipt Printer
Product: XPT 5, Hecon Printer Assembly (XP11110)
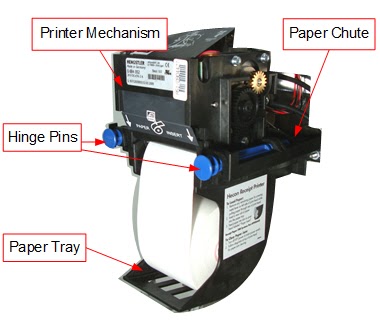
This topic describes the Hecon receipt printer in an XPT 5 and XPT 5+.
This printer is identical to the Hecon receipt printer used in previous XPTs, except that it includes a different length USB cable and does not include a power cable.
Connections
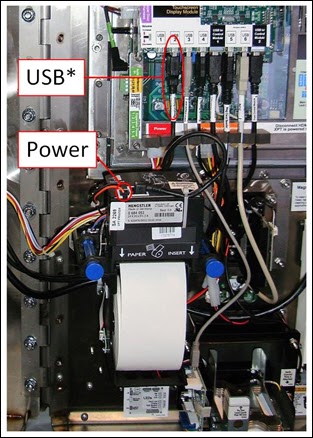
The XPT 5 Hecon receipt printer receives power from a connector on the lower door harness, and communication through a USB cable that connects to the display module USB hub.
*USB cable could be connected to any of the (6) USB ports on the display module.
Serviceable Fasteners
Maintenance
Receipt paper specs
Roll Width: 2.29" - 2.39" (58mm - 60mm)
Maximum Roll Outside Diameter: 4" (100mm)
Outside Core Diameter: 1" - 1.16" (25.4mm - 29.5mm)
Paper Thickness: 2.0 micron - 2.4 micron (50 - 61 µm)
Notes: White thermal sensitive paper with thermal coating wound to outside and optional pink paper low indication.
DRB Systems XPT Receipt Printer Paper Part #: PP00440
Paper loading procedure
Remove any remaining paper from the print head.
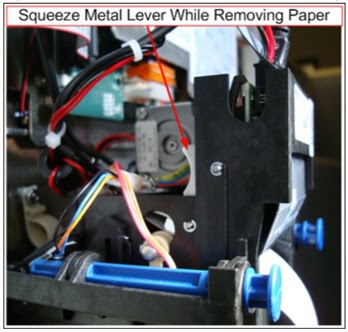
Squeeze and hold the metal lever on the left side of the print head. Note: The lever travels a very small distance, and therefore may not feel like it has been activated properly. Tension on the paper will be released when properly activated.
Connections
The XPT 5 Hecon receipt printer receives power from a connector on the lower door harness, and communication through a USB cable that connects to the display module USB hub.
*USB cable could be connected to any of the (6) USB ports on the display module.
Serviceable Fasteners
Maintenance
Receipt paper specs
Roll Width: 2.29" - 2.39" (58mm - 60mm)
Maximum Roll Outside Diameter: 4" (100mm)
Outside Core Diameter: 1" - 1.16" (25.4mm - 29.5mm)
Paper Thickness: 2.0 micron - 2.4 micron (50 - 61 µm)
Notes: White thermal sensitive paper with thermal coating wound to outside and optional pink paper low indication.
DRB Systems XPT Receipt Printer Paper Part #: PP00440
Paper loading procedure
Remove any remaining paper from the print head.
Squeeze and hold the metal lever on the left side of the print head. Note: The lever travels a very small distance, and therefore may not feel like it has been activated properly. Tension on the paper will be released when properly activated.
Pull any remaining paper through the rear of the print head.
Release the metal lever.
Remove the core left over from the previous paper roll from the paper tray.
Insert the new paper roll into the paper tray.
Place the new paper roll into the paper tray with the orientation shown below.
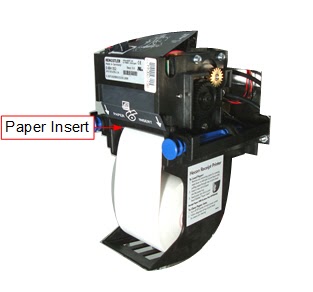
Insert the edge of the paper into the paper slot in the rear of the print head labeled "Paper Insert".
The paper will automatically feed into the printer.
Disassembling the paper chute
Turn off the XPT.
Unlock the XPT main door. The security login screen appears.
Log in to security. The Main Status Screen appears.
Open the XPT main door.
Turn the power off using the switch on the front of the power module.
Disconnect the power and USB cables from the printer mechanism. Note that you must press a locking tab on the power connector to remove it.
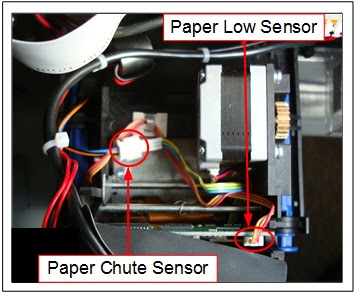
Disconnect the paper chute sensor and paper low sensors from the printer mechanism.
Bend the tabs open on the cable clamp, securing the paper chute sensor wires.
Pull both hinge pins to the rear position.
Lift the print mechanism up and off the paper tray, and set aside.
Pull the paper chute through the rear of the opening in the XPT main door.
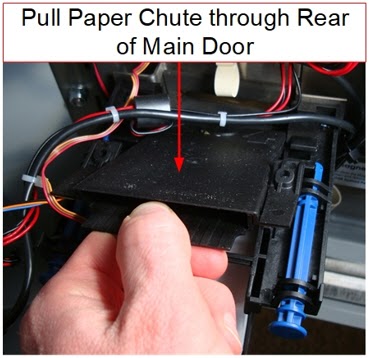
Disassemble the paper chute by sliding the top and bottom half of the paper chute in opposite directions and pulling them apart.
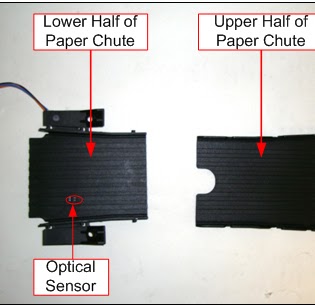
Cleaning the paper chute optical sensor
The paper chute sensor should be cleaned every 4 months at minimum, using one of the following methods.
With a foam cleaning swab.
Lightly coat a foam cleaning swab (Grainger part number: 1UYE1) with isopropyl alcohol.
Insert the swab into the paper chute and clean the paper chute sensor thoroughly as shown below.
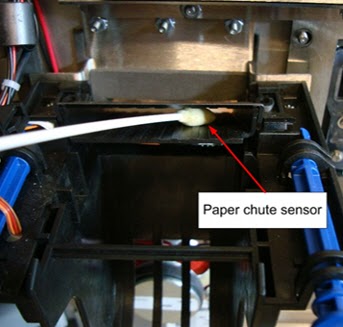
By disassembling the chute.
Follow the "Disassembling the paper chute" section above to gain access to the sensor.
Clean the sensor using a rag dampened with isopropyl alcohol, until all paper residue is removed.
Follow the disassembly steps in reverse order to reassemble the printer assembly.
Cleaning the paper low sensor
Remove the receipt paper from the print mechanism.
Remove the paper roll from the paper tray.
Use a can of compressed air to clean the paper low sensor.
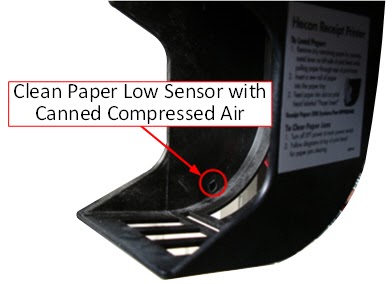
Reload the paper according to the "Paper loading procedure" section above.
Clearing paper jams
From the print mechanism.
If the Hecon receipt printer detects a jam, it will automatically attempt to clear the jam by reverse-feeding the last printout through the rear of the print head.
Squeeze and hold the metal lever on the left side of the print head. Note: The lever travels a very small distance, and may not feel like it has been activated properly. Tension on the paper will be released when properly activated.
Gently pull the paper through the rear of the printer mechanism.
Pull the right hinge pin to the rear position.
Tilt the printer mechanism to the left.
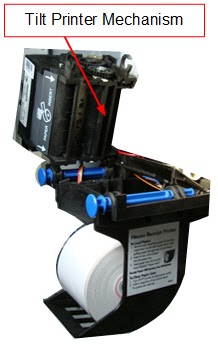
If any torn pieces of paper remain in the paper chute, remove them.
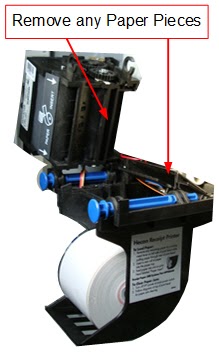
If a torn piece of the receipt paper appears stuck in the print head, use the following steps to remove it.
Turn the XPT off at the main power switch.
Manually turn the drive pinion gear clockwise to eject the paper from the print head.
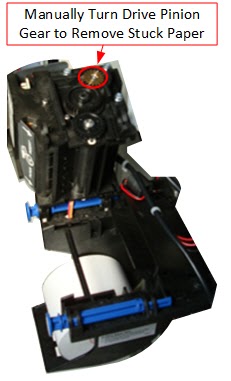
Tilt the printer mechanism to the right so that it is back to the normal operating position.
Slide the right hinge pin forward.
From the paper chute.
Follow the "Disassembling the paper chute" section above.
Remove any paper scraps or foreign material from the paper chute.
Follow the disassembly steps in reverse order to reassemble the printer assembly.
Replacing
WARNING: Turn off the XPT before modifying any power wiring connections.
An employee with security access must enter his or her employee information into the XPT after unlocking, but before opening, the main door. Failure to follow this procedure causes the alarm to sound.
Tools needed
5/16" nut driver
1. Turn off the XPT.
a. Unlock the XPT main door. The security login screen appears.
b. Log in to security. The Main Status Screen appears.
c. Open the XPT main door.
d. Turn the power off using the switch on the front of the power module.
2. Remove the paper roll from the paper tray.
a. Squeeze and hold the metal lever on the left side of the print head. Note: The lever only travels a very small distance, and therefore may not feel like it has been activated properly. Tension on the paper will be released when properly activated.
b. Pull any remaining paper through the rear of the print head.
c. Release the metal lever.
d. Remove the paper roll from the paper tray.
3. Disconnect the power and USB cables from the printer mechanism.
a. Note that a locking tab must be pressed on the power connector while disconnecting.
4. Remove the receipt printer.
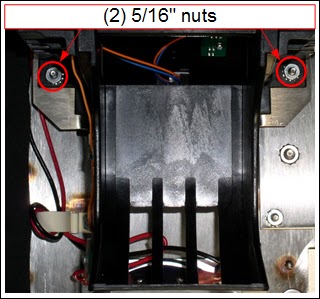
a. Loosen and remove two (2) 5/16" nuts securing the receipt printer, while supporting the printer.
b. Remove the receipt printer by pulling it through the opening in the main door.
5. Install the new receipt printer.
a. Slide the paper chute of the new printer through the opening in the main door.
b. Replace the two (2) 5/16" hex nuts to secure the printer.
6. Reconnect the power and USB cables to the printer mechanism.
7. Turn on the XPT and log in to security.
a. Turn the power on using the switch on the front of the power module. The XPT starts up and the security login screen appears.
b. Log in to security. The Main Status Screen appears.
8. Test the receipt printer operation in maintenance mode.
a. Press the Enable & Test Hardware button. The Enable & Test Hardware screen appears.
b. Press the Receipt Printer button. The Receipt Printer screen appears.
c. Press the Print Test Pattern button. An XPT test receipt should print. If the test receipt does not print, troubleshoot the receipt printer using the steps in the "Troubleshooting" section below.
d. When finished, press Exit twice.
9. Close and lock the XPT main door.
Troubleshooting
An employee with security access must enter his or her employee information into the XPT after unlocking, but before opening, the main door. Failure to follow this procedure causes the alarm to sound.
Receipt text is too light or too dark
1. Adjust the print density in maintenance mode.
a. On the Main Status Screen, press the Enable & Test Hardware button. The Enable & Test Hardware screen appears.
b. Press the Receipt Printer button. The Receipt Printer screen appears.
c. Press the Change Print Density button. A Print Density input dialog appears.
d. Enter a value between 65 and 165 to adjust the print density lower or higher. Note: A higher print density produces darker print.
e. Press Enter. The dialog closes and the entered number appears in the center section of the screen.
f. When finished, press Exit twice.
Receipts print in maintenance mode but not for sales
1. Verify the printer driver is configured correctly (employee access level Manager+ or with IT Support)
a. Open Site Manager.
b. Click Setup>Peripheral Management System>Peripherals. The Peripherals editor opens.
c. Locate the XPT Hecon receipt printer entry for this XPT.
d. Verify that the *Driver field is set to XPTC56GraphicW.
Receipt printer status is Paper Jammed (602)
1. If the paper chute optical sensor becomes dirty or if its cable becomes damaged, the receipt printer assumes a receipt is jammed in the chute, and will halt printing until the sensor is repaired.
2. Inspect the wires connected to the paper chute sensor and verify that no abrasions exist.
3. Verify nothing is blocking the paper chute sensor.
a. Tilt the printer mechanism to the left.
b. Look into the paper chute and verify there is nothing physically blocking the paper chute sensor.
c. If necessary, follow the steps in the "Maintenance" section above to disassemble the paper chute and clean the chute sensor.
Receipt printer status is Paper Low (605)
1. Verify the receipt paper matches the specifications described in the "Maintenance" section of this document. Receipt paper with the wrong core diameter causes improper paper low detection.
2. Inspect the paper low sensor.
a. Inspect the wires connected to the paper low sensor and verify that no abrasions exist.
b. Verify that the paper low sensor connector is fully seated on the printer mechanism.
Receipt printer indicates a communication-related error in maintenance mode
1. Common XPT device communication-related error statuses.
Cannot Connect (1)
Communication Error (9)
Connect Failed (4)
Disconnected (5)
Not Initialized (7)
No Response (10)
2. Enable and disable the receipt printer in maintenance mode.
a. While on the device screen in maintenance mode, press the Now Enabled (press to disable) button. The status of the device changes to Disabled.
b. Press the Now Disabled (press to enable) button. The status of the device changes to OK (0).
c. If the status of the device is anything other than OK (0), continue troubleshooting.
3. Restart the XPT.
a. nlock the XPT main door. The security login screen appears.
b. Log in to security. The Main Status Screen appears.
c. Open the XPT main door.
d. Turn the power off using the switch on the front of the power module.
e. Wait a minimum of 10 seconds.
f. Turn the power back on.
4. Verify the receipt printer connections.
a. Disconnect and reconnect the receipt printer USB cable to the display module USB hub.
b. Connect the receipt printer USB cable to a different port on the display module USB hub.
c. Verify the receipt printer power connector on the lower door harness is fully seated on the top of the receipt printer.
d. Inspect the receipt printer USB cable connection at the receipt printer, and verify that it’s fully seated.
5. If the issue persists, the receipt printer should likely be replaced.
Receipt printer AND any other device connected to the display module USB hub indicates a communication-related error in maintenance mode
1. Common XPT device communication-related error statuses.
Cannot Connect (1)
Communication Error (9)
Connect Failed (4)
Disconnected (5)
Not Initialized (7)
No Response (10)
2. Adjust the USB cable connection.
a. Disconnect and reconnect the (2) USB cables between the display module USB hub and the USB ports on the front of the control module, and then restart the XPT.
b. Connect the (2) USB cables between the display module USB hub and the control module to different USB ports on the front of the control module, and then restart the XPT again.
c. Swap the position of the (2) USB cables from the control module at the USB Type-B ports on the display module USB hub, labeled “USB to Control Module 1” or “USB to Control Module 2”, and then restart the XPT again.
White Water guide · Download PDF ↗